WMS SKU Management: general changes in Globe and WMS ASP
WMS documentation
Introduction
This document describes the general changes made in Globe and on the ASP hand
terminal, related to E-WMS SKU Management.
Description
Related to the
introduction of E-WMS SKU Management in product update 401, following
general changes were made.
Changes in Globe menu's and screens
- System, General, Settings, SKU setting group
- System, General, Settings, E-WMS General, Bartender scan folder
setting (was already added in 400)
- System, E-WMS, Scanners, General scanner settings, Auto. SKU label
screen setting
- System, E-WMS, Labels: applications SKU - Handheld: inner and
SKU - Handheld: outer
- WMS, Reports, Item/Stock view: possibility to view stock on SKU level
- WMS, Reports, SKU history per SKU
- WMS, Reports, SKU history per location
- WMS, Setup, Item Locations: new WMS location properties like dimensions
and 'stackable' (hidden in 401 until used for SKU Replenishment)
- WMS, Setup, SKU, SKU per item
- WMS, Setup, SKU, SKU Types
- WMS, Setup, SKU, SKU Type links was removed
- WMS, Checks, SKU diagnose
- WMS, Checks, Cleanup SKU history (not implemented in SKU 1.0)
- Control Centers: added 'SKU' and 'scan unit' columns
- Control Center 'filter
order lines' window: added SKU type selections
Changes in ASP hand terminal screens
SKU label button
A new button will be visible when SKU Management is enabled: the SKU label
button

This button starts the SKU label screen and is visible in stock receipt or
creation processes.
The button is only enabled after selecting a SKU item (so the item has to be
scanned first).
SKU label screen
A new screen was created to offer label printing functionality. The screen
can be started
automatically in SKU receipts processes or pressed when labels are needed.
When 'automatic start' is enabled, it will show automatically after a SKU item
code has been scanned, the screen has following steps:
- When a SKU item has more than one SKU configuration, then the
appropriate SKU type has to be selected.
- After that, you have to enter for which quantity (in sales units) you wish to print labels. In guided receipt processes, the quantity will be
prefilled with the ordered quantity
- The number of labels to print is calculated (rounded up) and suggested.
You are able to overwrite the number of labels to print.
After input of the number of labels, the new SSCC numbers are generated and
stored, and label printing is started immediately (when properly
configured).
You will then continue with the receipt process and you can scan the labels you
just printed and applied to the SKU's.
Please note that this SKU label screen is used only to print labels. The
quantity entered here is not copied to the receipt process, and the generated
SSCC numbers are not automatically received yet.
You have to scan the SSCC numbers you just printed in the receipt process, per
separate SKU receipt line.
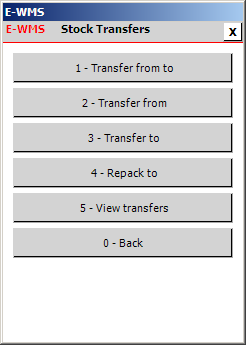
Repack menu
The menu '4 - Repack to' was added to the ASP Transfers menu, allowing access
to SKU repack functionality.
SKU/Sales Unit switch
When scanning a SKU number, for example in transfers, it should also be
possible to transfer part of the SKU (loose sales units), and break up the SKU.
But it would not be efficient to be forced to always input the quantity to be
transferred when you also transfer full pallets.
That is why a new 'switch' has been provided on the hand terminal, to indicate
if you want to transfer the whole SKU, or part of it:

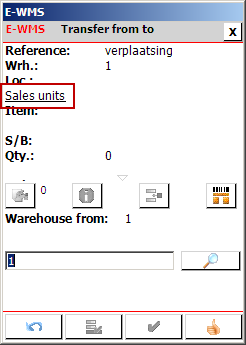
When tapping on this switch, it will switch between 'SKU' or 'Sales units'.
The default value is 'SKU'.
When set to 'SKU', it is assumed that you will transfer the whole SKU:

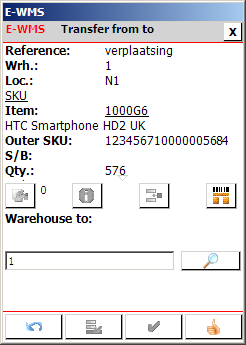
When set to 'Sales units', you will be able to enter the quantity to be
transferred:


Related documents
| Main Category: |
Support Product Know How |
Document Type: |
Support - On-line help |
| Category: |
On-line help files |
Security level: |
All - 0 |
| Sub category: |
temporary |
Document ID: |
22.195.106 |
| Assortment: |
E-WMS
|
Date: |
29-06-2011 |
| Release: |
|
Attachment: |
|
| Disclaimer |
|
|